

Hy-Flow Factory Air Cleaner
Modifying a factory stock Air Cleaner to a high airflow filter system while keeping the stock appearance.
By Tony Anzalone
2002V-Star 1100 Custom
Standard Disclaimer:
I take no responsibility for damage caused to your engine, if you try this project. Increasing the airflow will cause the engine to run lean, hot, can burn valves or can cause severe engine damage. You should re-jet or have a competent tech do it for you.
Background:
Let me start by saying, I think the JAK or DBAK with the individual K&N Filters is the optimal for performance and least expensive. It eliminates all the plumbing and gives the maximum airflow. But I Really liked the looks of the stock Bell shaped air cleaner unit on the 1100 Custom. Call me crazy!
A week after I got my bike I installed the "Barons Nasty Boy Slasher" Slip on Pipes, never even tried the baffles, and it runs fine with out any jetting. I also disabled the AIS system. I love the sound and I personally believe that a "loud bike is a safe bike", especially here in Florida, retirement heaven.
I naturally considered the BAK (Big Air Kit), by Barons, to go along with the Baron pipes on my Bike. I have noted that everybody that has installed a BAK and done the proper jetting claims fantastic results. The BAK has a larger free flowing Filter in a very nice looking package with a very nice aluminum billet air cleaner, but the BAK is essentially still using the stock restrictive air box and plumbing.
I decided to be creative and see if I could get similar results of higher air flow from the stock unit and save some money too.
Materials used:
I purchased a used stock air unit, so if I screwed up, I would still have my original to fall back on.
1- K&N Replacement High Flow Air Filter, called a "K&N FilterCharger PN# YA-1199" - $59.95.
2- ½" gasket tape to seal the modified K&N Filter.
Some Practical Theory:
(K&N Filters deliver 6.03 CFM per square inch of filter surface area. YA-1199 delivers aprox 22.8 CFM).
* A= Area Needed for a 65cid /1100cc = (cid X maxRPM) divded by 20.839
*A=(.065cid X 6500rpm =422.5)/20.839 = 20.27cfm needed for 65cid @ 6,500rpm
General information:
To start with, the stock system works in reverse. Unfiltered air is feed to the inside center of the filter, through the filter ring to the intake plumbing to the carbs. Most systems have the unfiltered air feed from the outside through the filter ring to the inside plumbing to the carbs.
LET'S GET TO WORK:
I wanted to remove all air restriction from the out side to the inner Filter surface.
The Inner side of the filter has approximately a 4.5" diameter by 1" filter surface to feed or 14.13sq. Inches. (Pie-x-Diameter = circumference = 3.14 x 4.5" = 14.13" x 1"= 14.13sq. inches)
First remove the rubber tube that goes between the air intake cabinets in to the filter cabinet. This serves no other purpose I can see other than force the airflow into gymnastics on its way to the filter surface. It also reduces the 2.25" hole between the cabinets, to a 2" hole and is the biggest bottleneck in the whole system.
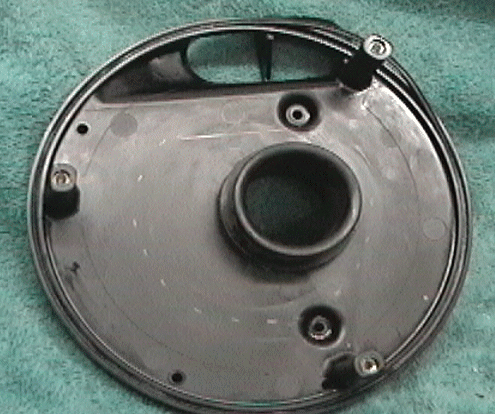
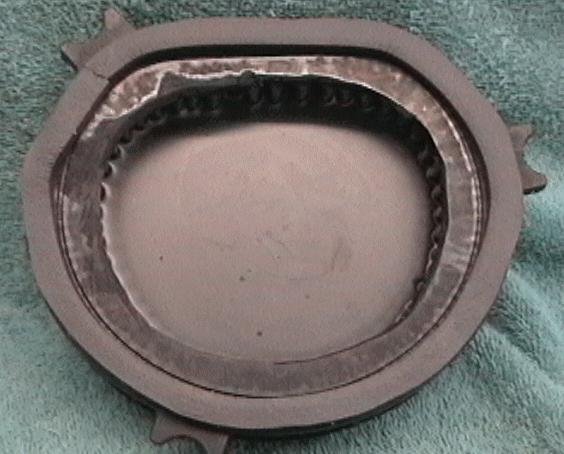
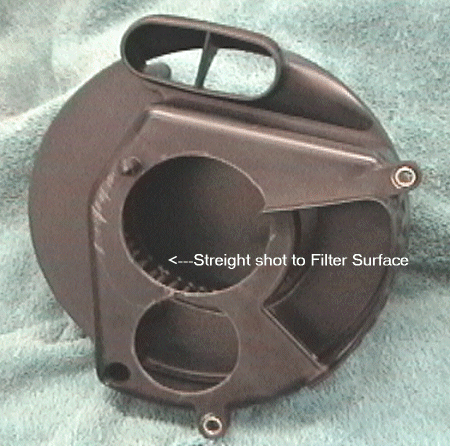
1- Filter Cabinet:
I cut out to approximately, (because it is a circle with a flat on one side), a 4.25" semi-round opening.
** Make sure you do not cut the mounting lip on the backside (see picture below).
This original 3.14 sq. inches is now increased by +11.03 sq. inches to 14.17 sq. inches of airflow to the filter.
Original: 2." circle area = 3.14 sq. inches flow area, (pie- R- squared = 1.00" x 1.00" x 3.14 = 3.14 sq. inches). Modified: 4.25" = 14.17sq.inch circle flow area, (pie- R- squared = 2.125" x 2.125" x 3.14 = 14.17 sq. inches).
Click on image to see larger more detailed picture
Stock Filter Cabinet with tube Modified Filter Cabinet Front Modified Filter Cabinet Back **Warning - Back Lip
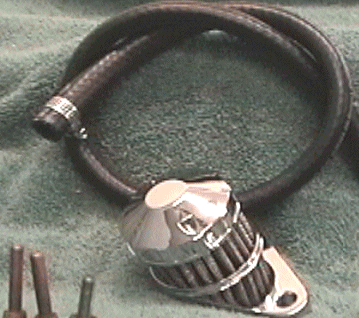
2- K & N Filter:
K&N's Filtercharger® can actually double air flow, but because it was designed to fit the stock air box it also has a limited 2.25sq. inch hole.
I cut out the maximum material up to the edge of the filter surface. I found that using sheet metal shears was my best option for cutting. But be careful the K&N Plastic is less pliable than the stock filter and will chip out, so take it real slow. Then covering the filter element to keep dirt out, I cleaned it up with a dremel sanding tool. I added ½" gasket tape for sealing.
This modification increases the original limited airflow from 3.976sq. Inches to 14.17 sq. inches.
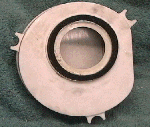

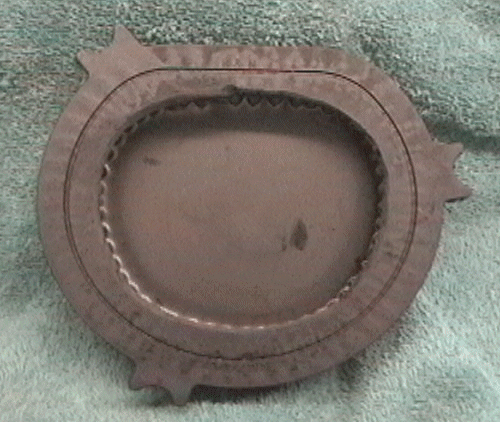
Stock Air Cleaner K&N Filtercharger Modified K&N Filter Completed w/ Gasket tape
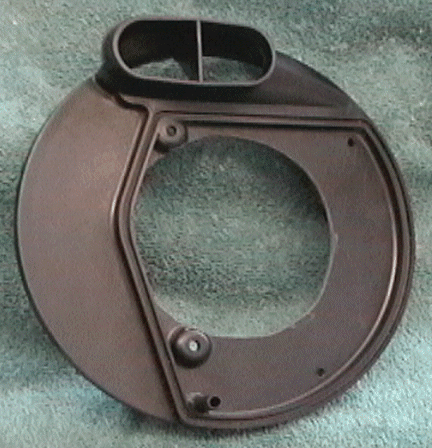
3- Intake Cabinet:
The original opening is approximately 5sq. inches for air to flow through. And to make it worse it is routed around a air dam. I Have Drilled with a hole saw, a 2" Hole and a 3' hole, in the back increasing intake flow by 10.2sq.inches to 15.2 sq. inches. I have also cut down the vertical air dam to .50 inch. I left the half-inch to keep some physical integrity and strength.
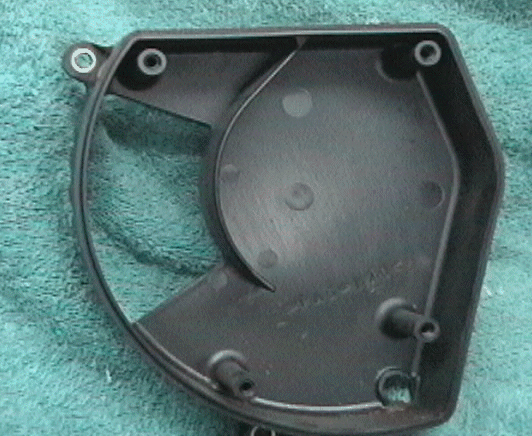
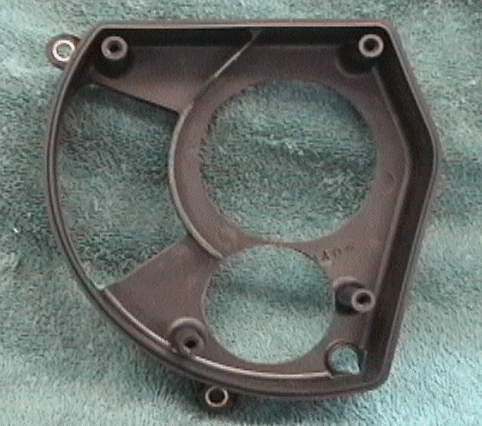
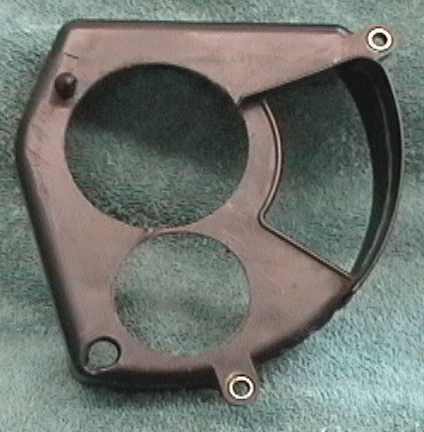
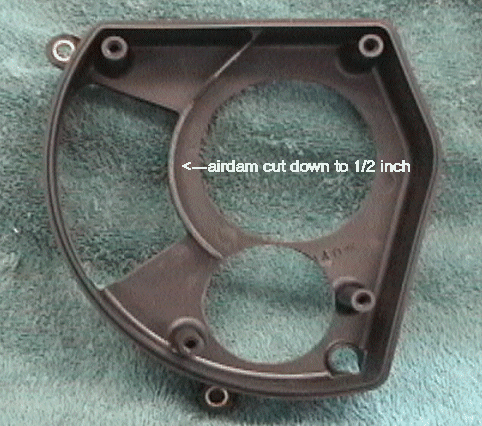
Stock Intake Cabinet Modified Intake Cabinet Front Modified Intake Cabinet Back Air dam Cut
Summation:
I have increased the available airflow to the filter from 3.14sq. Inch opening, to 14 sq. inches, while taking advantage of the K&N High Flow Filtercharger and have not changed the appearance of the Stock 2002 V-Star 1100 Custom Motorcycle. I also created a smooth flow of air and eliminated all the physical airflow gymnastics of the stock system. I did spend a little money on a second used air box for the sake of experimentation.
Together Side View
 View
from the Intake
View
from the Intake
Costs: Other than my labor, the total cost is under $62.00.
Crankcase Breather:
So as to not get engine engine oil all over our nice new K&N High Flow Filtercharger, I am installing a "Custom Chrome" #12-018 crankcase breather and mounting bracket.
I have heard that this 1100 engine pushes a lot of oil mist through the breather. But, I am not so sure that the rankcase is pushing that much pressure out to the breather?
I have contemplated the notion that the negative pressure, (vacuum), in the intake Air box may be sucking all that oil in. Think about it! The engine is sucking real hard to get as much air in through that limited intake set up. Put a breather hose in there and it also gets sucked on, (which is what the EPA really wants). I am sure I will get some E-Mail on this thought.
**Now, after a year of running this Breather Filter and not once, have I seen any oil or mess? I am not an expert, but for years, auto engines were vented the same way. I also think that having the hose routed upward allows any misting of oil to drain back to the engine, leaving the Breather Filter Dry.
1st problem was to find a plug for the 1/2" tube from the main air box that was going to the front cylinder crankcase vent pipe. I am using a spent brass case from my 45ca LC Colt. It is a perfect fit and I will fill it with some silicone caulk just in case the spent primer is not sealed. Since all the breathers I have found use 3/8" fittings, I will use a 1/2 "to 3/8" reducer.
I decided to bolt it on next to the horn assembly on the down tubes behind the tripple tree for now. I also placed a 1&1/2" pice of foam in to the breather pipe just befor the new breather, to block any oil mist. So I needed a 6mm x1.0 x 1.5" allen head screw to replace the 1' screw now in use. After mounting the crankcase breather, run a length of 3/8 hose to the top front cylinder, into a 3/8" x 1/2" adapter to the 1/2" hose into the crankcase vent pipe, secure and your done.
Crankcase Breather
 Breather
Mounted
Breather
Mounted 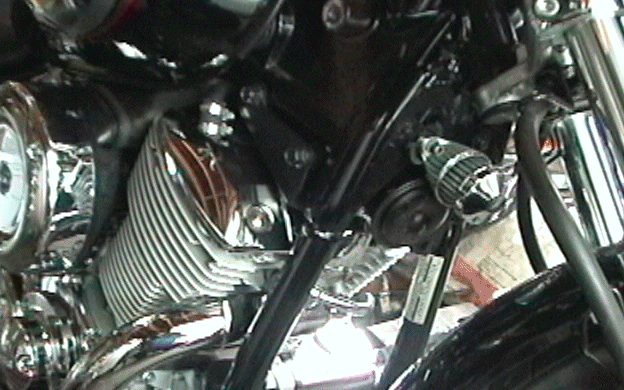
Materials used:
1 Custom Chrome #12-018 crankcase breather, $15.99
2ft. of 3/8" hose $1.00
1 1/2x3/8 reducer $0.80
1- 6mm x1.0 x 1.5" allen head screw $0.25
1- .45ca. LC Colt, spent brass, $ Priceless!
Dial-A-Jet:
I will also be trying out the Thunder Products "Dial-A-Jet", in place of regular trial and error Jetting. Thunderproducts.com
I found on the Star Forum, 4 or 5 people that are using the "Dial-A-Jet". Each one gave a great report on its uses and ease of installation. Back in the late 60's and 70's I jetted my street bikes, and it was fun and worth the effort. But now I am inclined to experiment with the Dial-A Jet. I will let you know how it works out. See the Dial-A-Jet install article.
Regular Jetting:
You can buy jets for about $ 4.00 each and on the V-Star 1100 many people like the Stock needles better than the kit needles. If the needles, (mid range), need to be richened, you can shim with #4 brass washers from Radio Shack.
I looked up the jets kit used with the Baron's BAK kit & depending on your exhaust pipes used, one of the listed jets and needle combinations should work..
|
4)Mikuni main jets |
#107.5, 110, 112.5, 115, |
|
(8) cap-head allen screws |
(2) titanium needles, |
|
(2) clips, |
|
|
Exhaust System Type |
Front Jet |
Rear Jet |
PMS |
Needle Hight |
|
Stock Factory Pipes & Filter |
112.5 |
110 |
? |
Factory Needle Hight |
|
After Market Pipes & Air Filter |
115 |
112.5 |
? |
Needle Clip Position # 4 from Top |
|
|
|
|
|
|
|
|
|
|
|
|
|
------------------------- |
---------- |
---------- |
------ |
----------------------------------------------- |
|
Dial-A-Jet |
Factory |
Factory |
2.5 - 3 |
Factory Needle Hight |
High altitude applications may require leaner jets
I also did some Exaust Baffle changes see artical Baffles
Final Comments:
If you like the stock V-Star look and just want to increase some hidden power without spending a ton, then this is for you. It is great to have an engine that can breath and deliver power as it was originally designed to do.
I now realize that I was driving my V-Star 1100 like a Harley. I was using the ample low-end torque to propel me into mid range never suspecting that a "mid to high range powerhouse" was hiding in the 1100 engine!
I can say that this combination of "Hy-Flow Air, K&N Filter, Dial-A-Jet and Exhaust" modifications have improved the hidden performance of the 1100cc engine. It defiantly increased the low-end torque and impressed me as to how hard it will pull into the upper RPM limits.
Have Fun & Ride Safe
Tony Anzalone
Give the Glory to GOD
Christian
Page
| Home
Page |
File
D/L |
Vietnam
Vets